Food always tastes better after spending a day outdoors and everything tastes better cooked over an open fire, so those meals shared around the ‘outdoor table’ are bound to form a wonderful part of your kid’s childhood memories. Kids love to help and most of these recipes are simple enough to let them have a go at doing it themselves with just a little adult supervision. Nutrition may be your top priority, but for the kids, we know it’s all about the treats – plus you are camping so you can afford to relax the reins just a bit. So, get them involved and they’ll be sure to eat whatever you make – even the pickiest eaters – and turn your campfire into a working stove; all you need is some tin foil and you can cook practically anything!
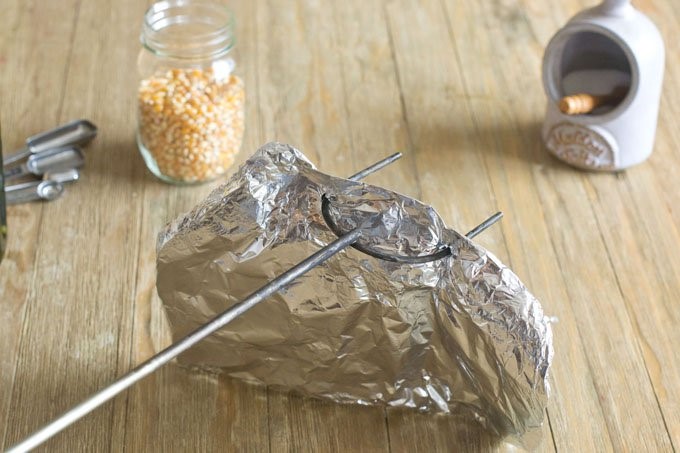
Popcorn is a fun and delicious snack to cook over the open fire and it’s a sure bet to get kids involved in campfire cooking. Incorporate the relaxing atmosphere of an open fire with homemade popcorn and you have the perfect camping treat.
Place the kernels and oil in the middle of a large square of foil. Seal the edges to form a loose pouch so that you leave room for the corn to pop. Attach the foil pouch to a sturdy stick with string or by poking the stick through the thick, pouch seal. Shake over the fire until popped.

A little less messy than a traditional s’more, these are a great, simple desert that the kids will love putting together. Get them chopping the fruit and assembling their cone for an all-in, hands on experience.
Chop up the fruit and set it aside on a plate or in bowels with the other fillings (I have also seen people use a large cupcake tray to ‘serve’ the fillings for easy assembly). Grab a waffle cone and wrap it in foil, leaving the top open so you can spoon in your fillings. Fill it to the brim with whatever takes your fancy and close the top. Add an extra layer of foil over the top of the cone to suppress any leakage. Place it on a grate over the fire and rotate regularly to make sure everything melts evenly without burning. 5 – 7 minutes and it’s ready to eat with a spoon or just like an ice cream. Gooey goodness!
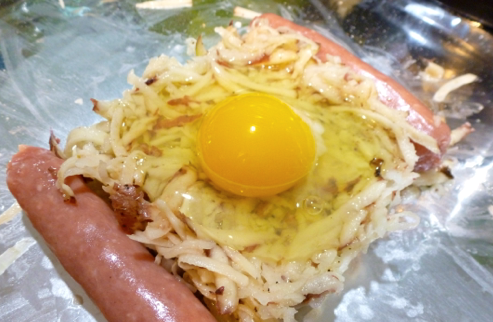
Foil breakfasts are a classic camping staple. Wrap some food up in foil, toss it in the fire and voila, a delicious meal. Kids will love cracking the eggs and grating the potato.
Grate the potato and season with salt, pepper and oil. Toss to coat. Place grated potato onto the open foil sheets and push it together to make a flat square with slightly raised edges. This will hold the egg in place. Pop a sausage at either end to support the potato. Crack an egg onto the middle of the potato. Close the foil and place over hot coals (or use a grate) for 15-20 minutes. Cooking time will vary based on the intensity of the fire.
Properly constructing your foil packet is the key to cooking success with this recipe so make a flat pack, to ensure even cooking and browning, by using a sheet of foil twice as long as you need, placing the food in the middle and bringing the ends together to roll down flat against your meal. Roll up the edges to seal. Layer more than one sheet of foil together when making your packet to avoid burning.
Can’t get your kids to sit still for dinner on the first night camping? Then this one’s for you. The entire recipe can be prepared ahead of time and simply reheated and assembled once you arrive at camp for an easy meal on the go. The kids will be sure to love it as they can choose their own toppings and still walk about to find new friends.
Brown the mince in a pan and drain off the fat before adding the onion to the meat to cook. Add the taco seasoning and water (follow specific packet instructions) to the pan and simmer until the sauce thickens and the water is absorbed. Allow to cool and store in a container to bring with you.
Prepare toppings and place in sealed containers or zip lock bags for easy transport and serving.
Reheat the meat over a fire or BBQ and place in a bowl. Have the toppings out for everyone to serve themselves. Open a packet of Doritos (you can cut the top open with scissors for the kids if you think they will rip the bag) and add whatever toppings you like. Hold the bag closed again and lightly crush and shake it around (the kids will love this bit) until the contents is sufficiently mixed. Open the packet again and eat with a fork or your fingers.
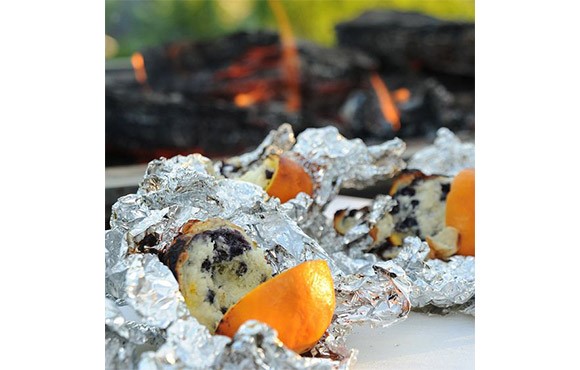
These babies are so delicious and so bombproof that even young kids can put them together with minimal help and throw them in the campfire.
Make up the muffin mix according to the directions. Slice open the top of the oranges. Using a knife, cut around the edge of the flesh of the orange and hollow it out with a spoon. Set aside for fruit time later. Get the kids to take an orange and spoon in the muffin mixture until it reaches about halfway up and then replace the lip. Wrap the orange in aluminium foil and toss it in the fire. The orange peel will insulate the muffin mix from burning and add a delicious orange flavour to it, like a steamed pudding. Turn the balls over regularly so that the mixture cooks evenly for around 10 – 15 minutes or roughly the cooking time on the packet mix. You can check to see how they’re going and always put them back if they’re not done. Unwrap and eat with a spoon. Try different varieties of muffin mix to see which the kids (and you) like best.
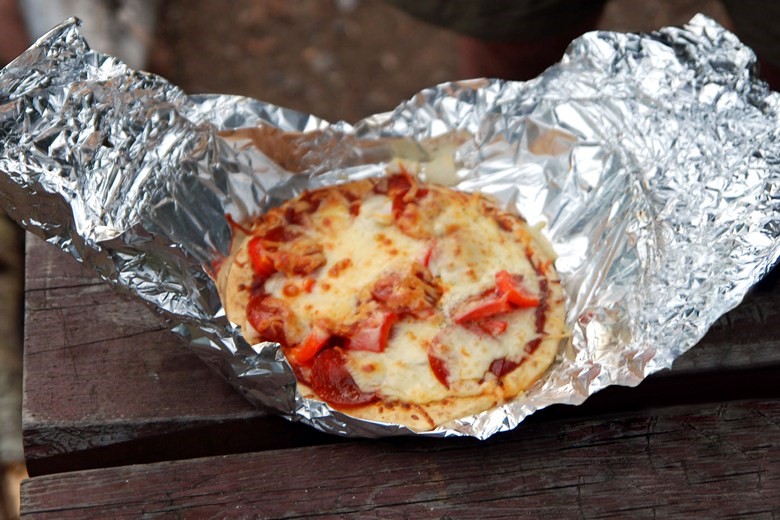
This is another one that can be prepped ahead of time or you can make a great group activity for the kids out of it with all the chopping required. You will also need to have your campfire nice and hot with a good amount of coals ready to go by the time everyone has finished assembling their pizzas.
Pull out a sheet of foil at least twice the length of your flatbread and place it in the middle. Layer your ingredients of choice on the top and make sure you put the cheese on last to stick it all down. Wrap the pizza using the flat packet method but allow some room at the top so the foil doesn’t rest on the toppings. Place on a grate above the coals and cook until the cheese melts and the toppings are heated through. You can keep checking to see when it’s done to your liking and to make sure the flatbread isn’t burning.
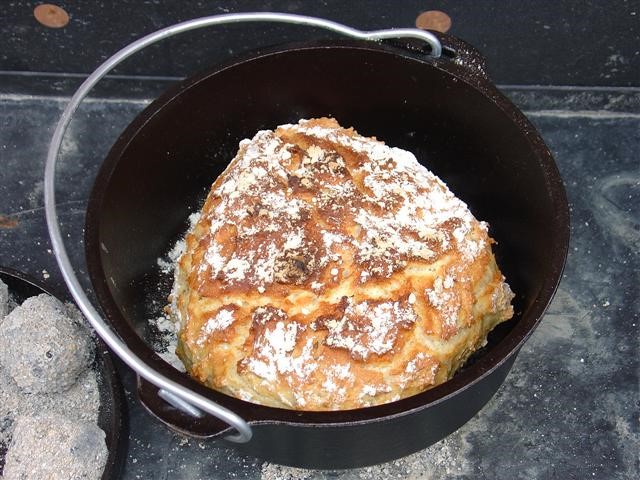
Damper is the great Australian bread. Perfect for breakfast with some butter and jam.
Mix the flour, salt and sugar (and whatever extras you would like) together in a bowl and rub in the butter pieces with your fingertips until it resembles fine breadcrumbs. Add the milk slowly and mix to form a soft dough. Knead lightly on a floured board until smooth and shape into a round loaf. Cut a cross in the top to allow it to expand and brush with extra milk. Grease and flour enough aluminium foil to thoroughly cover the bread dough and wrap it up. Place in hot coals or inside a camp oven with coals on top for approx. 30 minutes. To test if it’s done, tap on the loaf and it should sound hollow. Cut and serve while still warm.
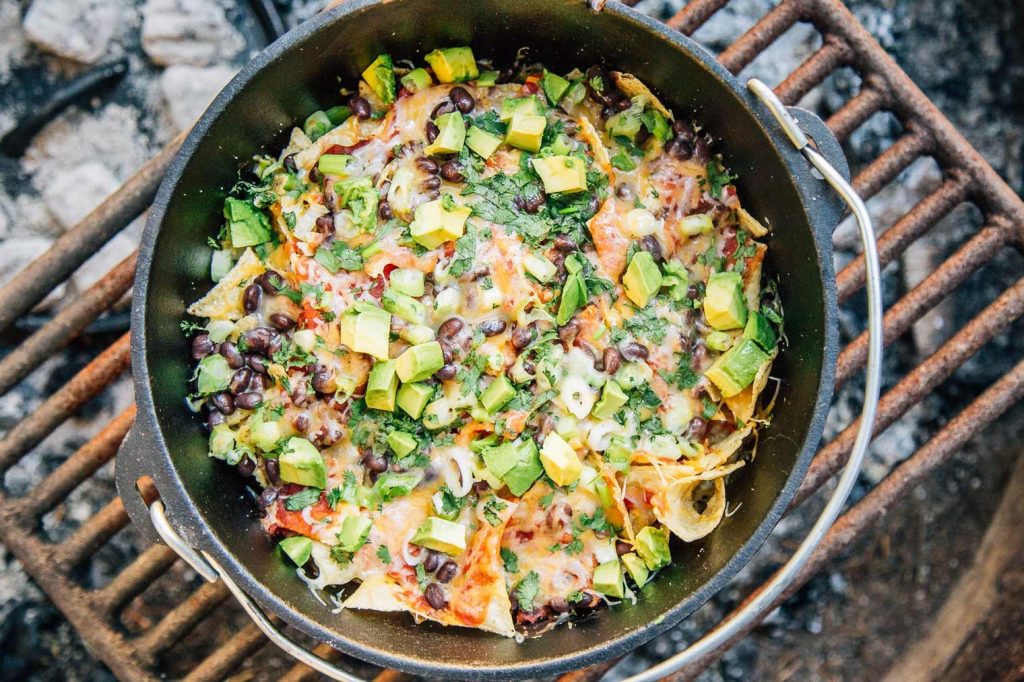
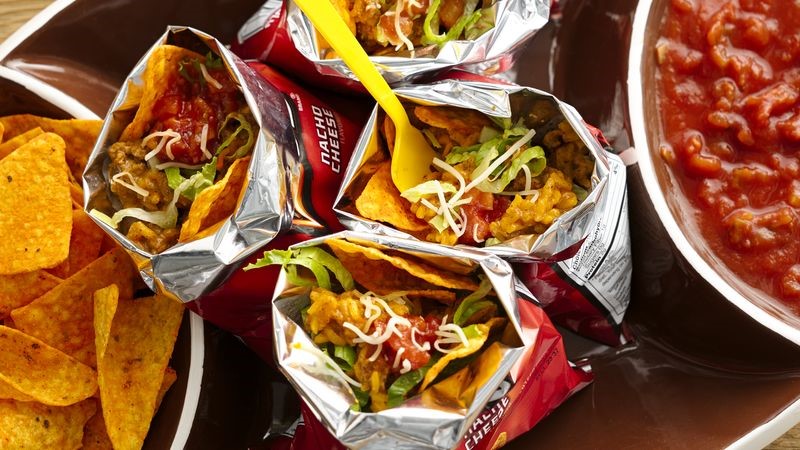
As a lazy weeknight dinner, nachos seem ideally suited to camping. What better way to end the day outside than with a cold beer, warm campfire and a big pot of cheesy goodness. This dish doesn’t require any special culinary expertise to pull off and can be eaten with your hands! Win, win.
Line a camp oven or skillet with enough foil to come up and over the sides. This will allow for easy clean-up later and you could possibly remove the nachos from the oven and serve on a plate. If you include a little liquid (from the tomato, beans or olives) in the bottom of the pot, the steam created will melt the cheese and soften the chips without burning. Then you need to ‘build’ the meal from the ground up. It’s all in the layers. One layer of chips, followed by one layer of cheese and toppings. Keep stacking until the pot is filled or you run out of supplies. Add a double helping of toppings and cheese over the top of everything and loosely close the foil over and place the lid on the camp oven. Bury into the coals so that you get an even cooking environment, grab a beer and sit back until it’s done. Better still, get the kids to do all the prep while you relax; there really isn’t any way you can mess this one up.
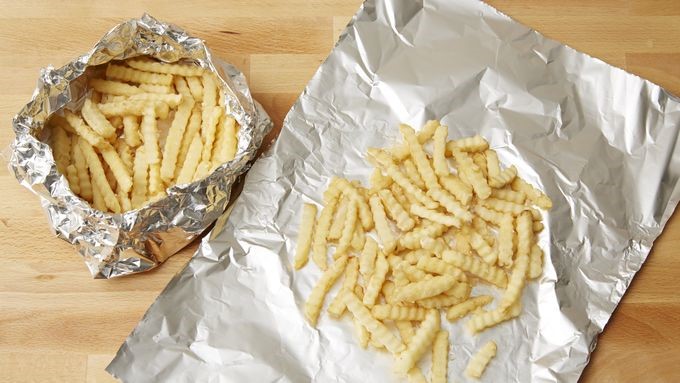
Anyone who has been camping knows that it isn’t always easy to serve and eat food around a campfire, so a tin foil meal you can eat out of the packet is definitely a winner. These are a bit like baked spuds, but without the fuss. No washing up and loads of fun!
Drizzle some oil onto the middle of the foil, add salt, pepper and any other spices and place a portion of chips on top. Use tongs to toss and coat the chips. Add whatever toppings take your fancy, but leave off any garnishes or toppings that don’t need to be cooked for later. Fold the foil up into a flat packet and place on coals or use a grate for around 20 – 30 minutes, turning occasionally to avoid burning. Carefully open your packet once the chips are nice and crispy and add any other toppings or garnishes before eating. Delish!
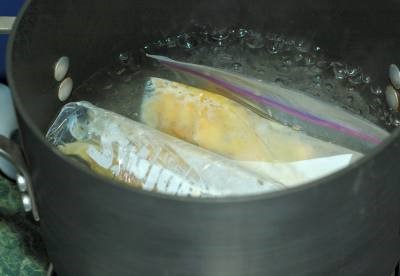
For the perfect camping breakfast that is quick, easy and dispels the arguments you can’t go wrong with an omelette in a bag. The kids will have great fun choosing their ingredients and you can rest assured that they’re having a decent breakfast before heading off for the day.
Place the pot on the fire or the camp stove to boil. Get the kids chopping and dicing all the ingredients and place in bowels ready for people to serve themselves. Grab a zip-lock bag and crack 2 (or more) eggs into it and add whatever fillings you would like. A couple of tablespoons of each is sufficient. Seal the bag and squish or shake it around to mix the ingredients. Label each bag with the owner’s name and lower into the pot of boiling water for around 12 minutes or until the egg is well cooked. Open the bag (being extra careful of the hot steam) and slide out onto a place to eat. N.B. Normal re-sealable or zip-lock bags are fine if you reduce your water to a rolling boil to prevent them from bursting open, otherwise specific steaming zip-lock bags are available that are safe at higher temperatures.
At Mars Campers we work hard to develop the best value for money camper trailers with a view of helping you create memorable experiences with your loved ones.
Did you find this information useful? If you found even one tiny nugget in this material to be useful, please do forward it to three of your friends. I am sure they will thank you for it. You can send it to them via email, Twitter, Facebook or post it on your own website.