
Every true camper should have a couple of rope tying tricks up their sleeve, but sadly, many of the basic camping knots that were so essential in the days of thick canvas tents and wooden tent pegs have dwindled to little more than a distant memory. In a world where there has been an explosion of gadgets and gizmos for seemingly every possible scenario, perhaps all you need is a gentle reminder of which rope goes over and which goes under (Dib dib, dob dob) to prove that a well tied knot will do the job just as well. Usefully, most knots are described in their name, so if you know a few basic terms, you’re more likely to understand what they are used for and why.
A knot is used to tie a rope to itself; shoelaces for example.
A hitch is used to tie a rope to another object, like tying a washing line to a tree or securing your dog’s lead to a post.
A bend is used when tying together two different pieces of rope, but is not really used in everyday scenarios (unless you’re making an escape from an upstairs window, namely a Sheet Bend) so I won’t cover them here.
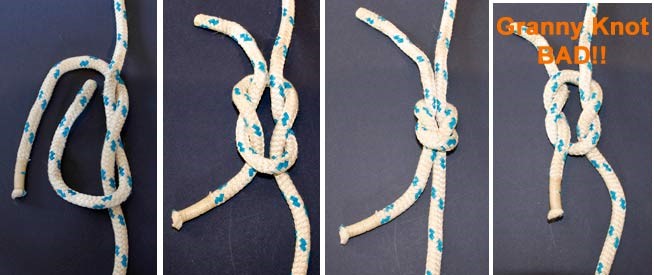
The Reef Knot is simple and perfect for tying together two lengths of rope; if you can remember the phrase: left over right – right over left, you will forever know how to tie one. Whether you are tying two ropes of similar thickness together to make a longer one, securing a bundle of firewood to carry back to camp, reconnecting a broken guy rope or tying a bandage, the Reef Knot is a winner. It is much more stable and secure than the dreaded Granny Knot. Simply hold a length of rope in each hand, lapping the left piece over the right to form an overhand knot and then tying another overhand knot in the reverse direction – right over left.
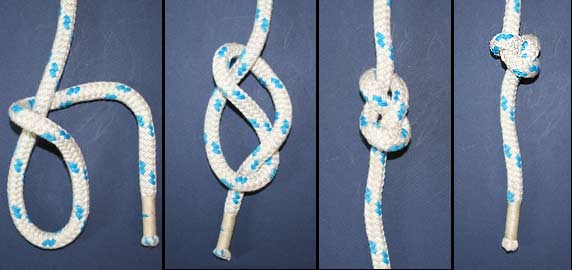
The Figure Eight, also known as a Flemish Knot makes a stopper at the end of a line under load, preventing it from slipping and it is necessary to use this knot before tying several other more complex knots. To tie a Figure Eight, simply pass the free end of the rope over itself to form a loop. Continue under and around the line and finish the knot by passing the free end down through the loop.

The Trucker’s hitch gives you a unique mechanical advantage to tightening and tensioning a line and makes the perfect adjustable guy rope pulley. While it’s a little complex, it’s great for securing tarps and shifting loads. Start off by tying a Figure Eight Knot with a loop of the line. Then pass the free end around the object to be secured and pass the rope through the loop. Next, pull the free end tight and secure it with two Half Hitches just below the loop.
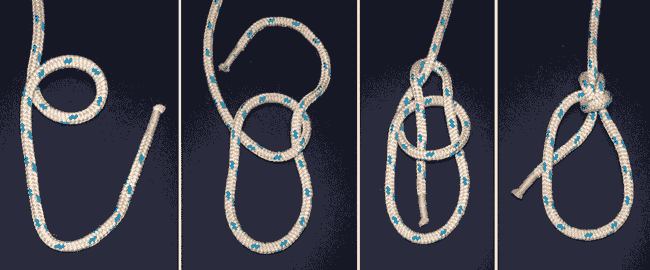
Just about anyone can tie a Slipknot, but it will almost always frustrate you when you try to use it for any practical purpose as you cannot control how tightly it constricts. A Bowline Knot, referred to as ‘King of the Knots’ creates a strong, non-slip loop that won’t constrict or expand but can easily be untied and has a myriad of uses. Lay the rope across your left hand with the free end hanging down. Form a small loop in your hand and bring the free end up to pass through the eye from the underside. Wrap the free end around the main part of the rope and put it back down through the loop. Tighten the knot by pulling on the free end whilst holding the main line.
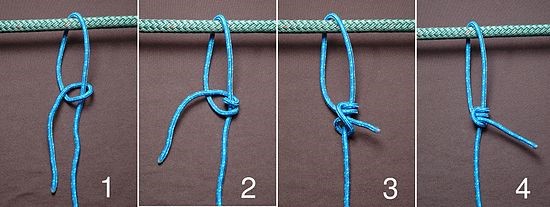
A Taut-line Hitch is used to create an adjustable knot that can slide back and forth along a line and is secure assuming it is tight. Use it to provide adjustable tension for guy ropes on a tent or tarp. To tie this hitch, create a loop by wrapping around something like a tree or tent peg. With the free end of the rope, wrap towards the peg twice around the main line. Make one additional coil around the main line on the outside of the coils you’ve just made and tighten the knot. Slide it up and down on the main line to adjust tension.
The fundamentals of knot tying are important for anyone to learn and can be used all the time while camping to tie down your gear, secure guy ropes, string up makeshift washing lines or hoist a tarp shelter. Kids can pitch in and help with setting up the camp or learn to secure the trailer for the trip home; knot tying is a valuable life lesson that has endless practical applications. No matter how you use them, once you’ve put them into practice, you’ll start to wonder how you ever did without them, so, it’s better to know a knot and not need it, than to need a knot and not know it.
At Mars Campers we work hard to develop the best value for money camper trailers with a view of helping you create memorable experiences with your loved ones.
Did you find this information useful? If you found even one tiny nugget in this material to be useful, please do forward it to one of your friends. I am sure they will thank you for it. You can send it to them via email, Twitter, Facebook or post it on your own website.